
Related Articles


A car air filter is one of those small parts that many drivers forget about until the engine starts feeling different. I believe regular air filter checks are an easy part of basic car maintenance because they do not usually require expensive tools or advanced mechanical knowledge. A clean air filter helps keep dirt and dust away from the engine while allowing the engine to receive the air it needs for proper operation.
If you have never checked a car air filter before, there is no reason to feel nervous. In most vehicles, the filter is located inside an air filter box under the hood, and checking it can take only a few minutes. Replacing it can also be simple when you use the correct replacement filter and follow the vehicle manufacturers instructions.
In this guide, I will explain how I check a car air filter, what signs tell me that it needs replacement, and how you can replace one safely at home.
What Does a Car Air Filter Do?
The engine needs air to burn fuel and produce power. Before that air reaches the engine, it passes through the air filter. The filter catches dust, dirt, insects, leaves, and other small particles that could otherwise enter the engine.
I think of the air filter as a protective barrier for the engine. Its job is not simply to keep the incoming air clean for better performance. It also helps prevent unwanted particles from reaching sensitive engine components.
When an air filter becomes heavily clogged, it can restrict airflow. The effect can vary depending on the vehicle and the condition of the filter, but a neglected filter is certainly not something I would ignore during regular maintenance.
When Should You Check Your Car Air Filter?
The recommended inspection and replacement interval depends on the vehicle, engine, driving conditions, and filter type. Because of this, I always recommend checking the owners manual first.
A car that is driven mostly on clean roads may need less frequent attention than a vehicle regularly driven on dusty or unpaved roads. Construction areas, dry climates, heavy traffic, and dusty environments can cause an air filter to become dirty more quickly.
Personally, I prefer checking the filter during routine maintenance rather than waiting for an obvious engine problem. A quick inspection can tell you whether the filter still looks usable or whether it is time for a replacement.
Signs of a Dirty Air Filter
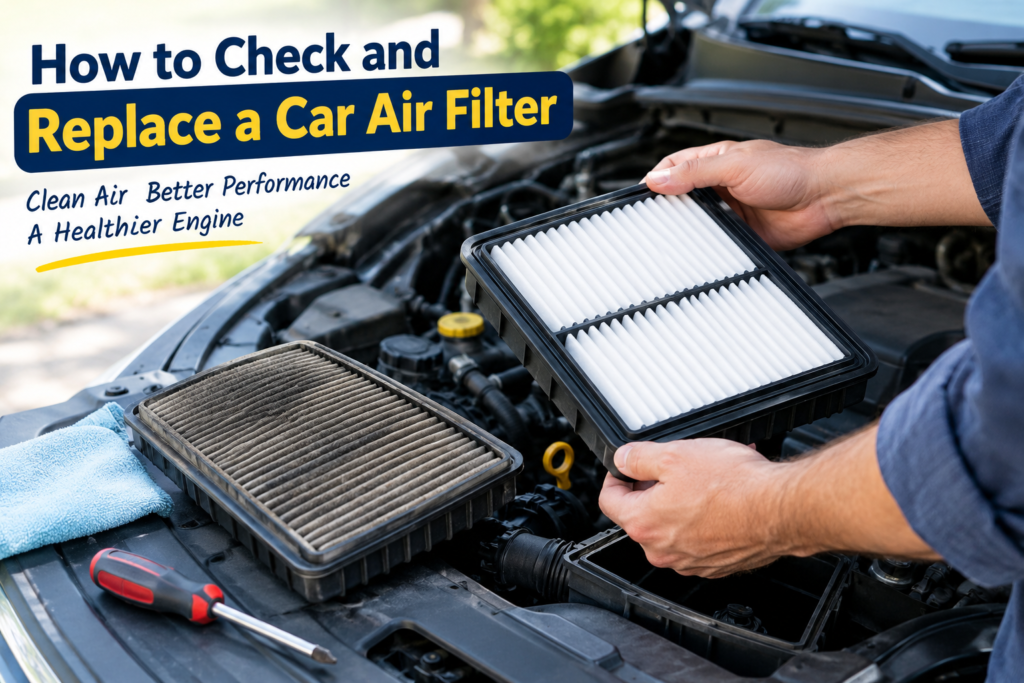
Sometimes the condition of an air filter is obvious when you remove it from the air filter box. It may look gray, brown, or covered with visible dirt.
Some possible signs of a dirty or restricted engine air filter include reduced engine response, changes in fuel economy, unusual engine behavior, or a visibly dirty filter. However, these symptoms can have many other causes, so I would not automatically blame the air filter whenever a car does not perform normally.
The best approach is to inspect the filter directly and follow the recommended maintenance schedule for your vehicle.
What You Need Before Starting
Replacing an engine air filter usually requires very few tools. Depending on your car, you may need a screwdriver, socket, or simply your hands to open the air filter housing.
Before starting, I would prepare the following:
A correct replacement air filter
A screwdriver or suitable tool if required
A clean cloth
A well lit working area
Your vehicle owners manual
Make sure the replacement filter is designed specifically for your vehicle. Air filters can look similar while having different sizes and shapes, so I would never buy one based only on appearance.
Step 1: Park the Car Safely
Before opening the hood, park the car on a level surface and switch off the engine. Allow the engine to cool if it has recently been running.
I prefer working when the engine is completely cool because there is less chance of accidentally touching a hot component. Make sure the vehicle is securely parked and keep loose clothing and objects away from moving engine components.
Step 2: Locate the Air Filter Box
Open the hood and look for the engine air filter housing. It is usually a plastic box connected to an intake tube that leads toward the engine.
The exact position is different from one vehicle to another. This is where the owners manual can be very helpful if you are unsure.
Once you find the air filter box, look at how it is secured. Some housings use clips, while others use screws or bolts.
Step 3: Open the Air Filter Housing
Carefully release the clips or remove the fasteners holding the air filter housing together.
I recommend paying attention to how everything fits before removing the cover completely. Taking a quick picture with your phone can also help you remember the original position of the parts.
Do not force anything. If the cover does not come off easily, check whether another clip, screw, or connector is still holding it.
Step 4: Remove and Inspect the Old Filter
Lift the air filter out carefully. Try not to shake dirt into the open air intake.
Now inspect the filter under good lighting. Look at the pleated filtering material and check for excessive dirt, leaves, insects, damage, oil contamination, or other unusual debris.
A little dust does not necessarily mean the filter needs immediate replacement. What matters is its overall condition and the manufacturers replacement recommendations.
If the filter is heavily clogged or damaged, I would replace it rather than trying to make it look clean again.
Step 5: Clean the Air Filter Housing
Before installing the new filter, inspect the inside of the air filter box. If you see loose dust or debris, carefully remove it with a clean cloth.
I would avoid pushing dirt deeper into the intake system. The goal is simply to leave the housing clean enough for the new filter to sit properly.
Be careful around sensors, electrical connections, and other components. Do not use water inside the air intake system unless the vehicle manufacturers instructions specifically allow it.
Step 6: Install the New Car Air Filter
Take the new filter out of its packaging and compare it with the old one before installation. Check that the shape, size, and sealing edge match.
Place the new filter into the housing in the correct orientation. It should sit naturally in its designated position without being forced.
This is an important step because a filter that is not seated correctly may allow unfiltered air to enter the engine.
I always take a moment to check the entire edge of the filter before closing the housing. A proper seal is just as important as having a clean filter.
Step 7: Close the Air Filter Box
Put the air filter housing cover back into its original position. Make sure there are no wires, hoses, or other parts trapped underneath it.
Secure all clips, screws, or bolts that you removed earlier. Do not overtighten screws because plastic housings can be damaged by excessive force.
Once everything is secure, inspect the intake connections around the housing. Make sure they are properly connected and nothing looks loose.
Step 8: Start the Engine and Check Your Work
After replacing the filter, start the engine and allow it to idle normally.
Listen for anything unusual. If the engine sounds normal and there are no warning lights or obvious problems, your basic replacement is likely complete.
If you notice a strange noise, engine problem, or warning light after working around the air intake system, switch the vehicle off and check your work. If you cannot identify the problem, getting professional assistance is the safer choice.
Can You Clean a Disposable Air Filter?
This depends on the type of filter. Many standard engine air filters are designed to be replaced rather than washed.
I would not wash or aggressively blow out a disposable paper filter unless the manufacturer specifically says it can be cleaned. Trying to extend the life of an unsuitable filter can damage the filtering material or reduce its effectiveness.
Some reusable filters are designed for cleaning and servicing, but they require different maintenance procedures. Always follow the instructions for the specific filter.
Common Mistakes to Avoid
One mistake I often see people make is buying the wrong filter. Always confirm the correct part number or vehicle compatibility before purchasing.
Another mistake is installing the filter incorrectly. Make sure it sits evenly inside the housing and that the sealing surface is properly positioned.
I also recommend avoiding excessive force when opening or closing plastic air filter boxes. Clips and plastic housings can become brittle over time.
Finally, do not ignore the air intake system after changing the filter. Make sure hoses and connections are properly secured before driving.
How Often Should You Replace a Car Air Filter?
There is no single replacement interval that works for every car. Many manufacturers provide a recommended inspection and replacement schedule, but driving conditions can change how quickly a filter becomes dirty.
If you frequently drive through dusty areas, on unpaved roads, or in environments with a lot of airborne dirt, you may need to inspect the filter more frequently.
Instead of relying only on a fixed number of miles or months, I think it is smart to combine the manufacturers schedule with regular visual inspections.
Why Regular Air Filter Maintenance Matters
Regular air filter maintenance is a simple way to stay aware of your vehicles condition. The filter protects the engine from airborne contaminants, and checking it gives you an opportunity to notice other problems around the air intake area.
I also like this type of maintenance because it does not normally take much time. You can inspect the filter during other basic maintenance tasks and replace it when necessary.
Keeping up with small maintenance jobs can make vehicle ownership easier because you are less likely to overlook basic components.
Final Thoughts
Learning how to check and replace a car air filter is a useful skill for any vehicle owner. The process is generally straightforward when you have the correct replacement filter and follow your vehicles instructions.
From my point of view, the most important part is not simply replacing the filter. It is making sure you inspect it regularly, install the replacement correctly, and keep the air filter housing and intake connections in good condition.
If you are comfortable working under the hood, this can be a simple maintenance task to handle at home. If your vehicle has a complicated air intake system or you are unsure about any step, there is nothing wrong with asking a qualified mechanic for help.
A clean and properly installed air filter is a small part of overall vehicle maintenance, but paying attention to small things is one of the best ways I believe we can take better care of our cars.